Saturday, December 19, 2020

CopyQ - Quick diff texts

TL;DR

In short, you can use the power of CopyQ commands in order to quickly compare any two pieces of text - just copy the texts into the clipboard and run the Diff Latest Items command on them. As always, simply follow the installation instructions in order to install the command into your CopyQ instance.

As mentioned in the documentation page, you will also need a compare tool that can be invoked by the CopyQ command in order to do the actual comparison. The last step is, possibly, to modify a part of the command's code. This part looks like the following at the time of writing:

// Choose your favorite diff tool (leave just one execute(...) uncommented):

// === Beyond Compare ===
// reference: https://www.scootersoftware.com/v4help/command_line_reference.html
execute('bcompare', name1, name2)

// === WinMerge ===
// reference: https://manual.winmerge.org/en/Command_line.html
// execute('winmergeu', '/e', '/x', '/u', '/fl', '/dl', 'item1', '/dr', 'item2', name1, name2)

Note: In order to work, the program passed to the execute() command must be on the system PATH, otherwise a full path to the program needs to be specified.

Story of the Diff Latest Items command

I don't know how you, but I pretty much hate doing something that a computer can do for me instead. In regards of this post, it is finding out differences in texts. It might be the case of comparing similarly looking methods in a source code, or for example similar paragraphs found on different web pages.

Of course, one can use many different tools to do the comparison, but they usually require you to firstly have files created that are going to be compared.1 So, I was looking for a quick and universal solution. And once you get familiar with CopyQ, creating a simple CopyQ command just for that is the next logical step, and that is how the Diff Latest Items command got created. Well, I'm not the original author of it though. :)

I was playing with this idea in my head for several weeks and just on the weekend when I started with implementation, I searched for an example of how to create a temporary file from CopyQ (so that it can be fed to an external comparison tool). And instead of an example, I found this ready-to-use script that was created just a few days before! So at least I improved its documentation and also added support for my favorite tool WinMerge, job done. :)

Conclusion

And what about you? Do you have some other tricks of how to compare text chunks? Or have you also found this CopyQ's command useful? Don't hesitate to let all know in the comments. :)


1 If you use Eclipse IDE, for example, and you are lucky enough to come across the AnyEdit Tools plugin, you can e. g. compare a part of an opened file with clipboard contents pretty easily. Yet, this still requires some clicking "here and there" and we also know that startup times of IDEs like Eclipse are not the best. ;)

Saturday, October 3, 2020

Google Analytics - Easiest way of not counting your page views

There are many ways of how not to count your own pageviews (or page views) into the Google Analytics (GA) statistics of your web site. Most of them are described for example in 5 ways to exclude your own visits from Google Analytics.

Let's have a look at the way I find myself one of the easiest ones for individual users and for sites that you can't directly control - like this Blogger site. As a side effect, we will also learn some basics of the Tampermonkey browser extension.

How to do it generally

In order to block your own visits from GA, you don't need to setup special IP-based or cookie-based filters in the GA administration, nor you don't need to install any fancy extension to your web browser.

All we have to do is to create a simple JavaScript snippet for your browser that will set a page variable called "ga-disable-UA-XXXXX-Y" to "true" before the GA's JavaScript code is run within any visited page (see Opt-out of measurement for your site for documentation on this). The snippet basically needs to look like this:

window['ga-disable-UA-XXXXX-Y'] = true;

You only need to replace "XXXXX-Y" with the GA ID assigned to your site.

How to do it via Tampermonkey

In order to be able to run our code, we need to have an extension installed in our browser. We will use the well known Tampermonkey here - just follow the instructions on its home page if you don't have this extension installed yet.

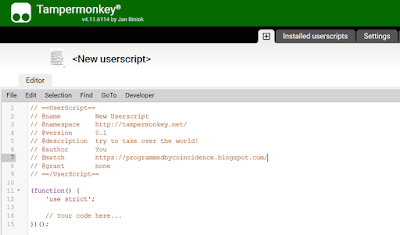
We click the Tampermonkey toolbar icon and then select "Create a new script..." from the popup menu. An editor appears that lets us edit our new script (called "userscript"):

Tampermonkey: Create a new script.

Next, we change the "@name" and optionally also other metadata of the script to whatever we like. We also need to edit the "@match" line, so that the script is run on all pages of our site (note that an ending "*" is necessary!). And of course, we also add the line mentioned above. Then we save the script.

The resulting script looks for example like the following, for this Blogger site:


// ==UserScript==
// @name         Block GA on my pages
// @namespace    http://tampermonkey.net/
// @version      1.0
// @description  try to take over the world!
// @author       You
// @match        https://programmedbycoincidence.blogspot.com/*
// @grant        none
// ==/UserScript==

(function() {
    'use strict';

    window['ga-disable-UA-158769633-1'] = true;
    console.info('Disabled GA');
})();

Finally, we need to ensure the script is run before the page gets rendered. We click on the "Settings" tab and choose "document-start" from the "Run at" combobox:

Tampermonkey: Run our script at document start (the other fields shown are not relevant).

Now when we visit our site, we should see that our script was executed - both from the Tampermonkey toolbar icon indicating one userscript was executed, as well as from the console output:

Seeing that our script was run on a visited site page.

As the last step, we should also see our GA console and make sure our visits are no longer counted.

When we have more sites

If we need to block another site, we just add another "@match" line with an expression matching that site and another "window['ga-disable-UA-XXXXX-Y'] = true;" line to the script.

And that's all, folks. :)

Sunday, March 22, 2020

CopyQ - The most useful commands

In this post, we will look at some of the most useful CopyQ commands that are either built-in, or that can be additionally imported from a dedicated project on GitHub. If you are unsure what CopyQ or its commands mean, or what are the various types of commands, I recommend you to read the quick introduction to CopyQ first.

Note: There are simply too many commands available to name them all, so what follows is just a selection of commands which I myself currently find generally the most useful. It's quite likely that depending on the stuff you do and applications you use, your selection of favorite commands might be different.

Built-in commands


Built-in commands are the commands which can be easily added to CopyQ via the "Add" button of the Commands window, as shown in the following screenshot:

CopyQ's "Add commands" dialog, listing all the built-in commands.

Command: Paste clipboard as plain text (global)


More often than not one needs to paste a clipboard content without any formatting. And that's exactly what the global command "Paste clipboard as plain text" does. This function is already built-in to some programs, e. g. into the LibreOffice suite, but many other programs don't have anything like that.

CopyQ also offers a similarly named command: "Paste as Plain Text". It does the same thing, but you run it upon a selected item from CopyQ's history instead of using the current clipboard content.

And that's all from built-in commands. Still, there are commands which you might find useful in specific scenarios, so you can surely give them a try as well.

Commands from the GitHub project


There is a dedicated copyq-commands project on GitHub, maintained by the CopyQ's author, that one can use to easily get to plenty of useful commands. Another pro of this project is that you can suggest or contribute new commands there.

Let's have a look of some handy commands from this project now. Note that there is a small gotcha that the commands are often called differently than in the project's documentation.

Command: Import Commands after Copied to Clipboard (automatic)


[documentation]

As described at the project's home page linked above, this command saves you time when adding other commands to CopyQ - so that you don't need to enter all the command attributes manually.

Warning: If the copied text is a link to a command on GitHub, the automatic import doesn't have to always succeed due to a general SSL issue #1177.

Command: Big Data Tab (automatic)


[documentation]

If you copy too big items, searching in the clipboard history might get slow. That's when this command steps in and moves an item into a dedicated tab if the item exceeds a predefined size (counted as a sum from all the item formats - e. g. plain text + html1).

Of course, you can change this limit - right at the beginning of the script. But how to find out how big an item is, without scripting? Simply select an item and select "Show Content..." from the context menu (or press F4) and you will see the size in bytes in the follow-up dialog.

Command: Replace All Occurrences in Selected Text (global)


[documentation]

This is a simple find-replace text function which is not that powerful and I can imagine it could be taken at least one step further. Yet, it nicely demonstrates some of the CopyQ's capabilities for those who want to write their own commands - like:
  • triggering copy and paste system events,
  • showing a user input dialog,
  • or using various JavaScript / ECMAScript constructs, including RegExp functions.

Command: Snippets (global)


[documentation]

This powerful command is my favorite one. In short, this command extends CopyQ so that it can be used as a simple tool for snippets, or templates, if you like.

This command is quite nicely documented, so I will just illustrate its usage on the following example:

Imagine you write a blog post and you want to insert a footnote and a corresponding footnote link into the post. As this doesn't have to be directly supported by your blogging system, you can use the Snippets command for generating relatively complex HTML code chunks:

An example of a dedicated tab with custom snippets.

An example of the snippet selection dialog when the Snippets command is launched.

An example of the final dialog where values for placeholders are to be filled in.


Customizing the command

You may want to add the resulting snippet text as another item to history and not to paste it immediately. In the simplest case, you would have to change the function pasteSnippet() of the command script from this:

function pasteSnippet(mime, content) {
  copy(mime, content)
  copySelection(mime, content)
  paste()
}

... to this:

function pasteSnippet(mime, content) {
  copy(mime, content)
  copySelection(mime, content)
  tab('clipboard') // change this to whatever default tab name you use
  add(unpack(content))
}

Of course, I can't give any warranty on this, but it is supposed to work at the time of writing.

Conclusion


As you can see, you can use CopyQ not only as a simple clipboard manager, but thanks to commands you can extend its functionality in many ways. Don't hesitate to share your own experience with CopyQ commands in the comments!

1 Note that for texts copied e. g. from MS Word the size of clipboard content in the HTML format can be surprisingly high (like several kilobytes) even for short texts. This is due to all the extra styling information added to clipboard by the source application.

Saturday, February 22, 2020

CopyQ for the impatient - Introduction

CopyQ is a really handy clipboard manager. As its name suggests, it enables you to easily return to previous items in your clipboard, but as you will see later, it offers much, much more. Thanks to its scripting capabilities, it is also a handy automation tool. I'm a big fan of CopyQ and I think it deserves more promotion, so I decided to create this, hopefully useful wrap-up.

Why to use it, and not something else?


On AlternativeTo, CopyQ holds the 2nd position with 162 likes at the time of writing. The 1st place is occupied by Ditto with 304 likes, but Ditto has one big disadvantage: it is only for Windows. For me, CopyQ is also much better when it comes to options of running custom commands (scripting). Both apps are free and open source.

When talking about Windows, since a recent Windows 10 build, you might use their built-in clipboard manager as well (just try to press Win+V if you own one). But even without trying out, I'm sure it will be pretty much behind CopyQ & co. when talking about productivity-boosting features for advanced users - just read on!

Features


Firstly, to make a basic idea of the app, here is a screenshot of its main window:

An example of CopyQ's main window, illustrating some basic terms.


Here are the main distinguishing traits of CopyQ:
  • Runs and offers the same interface on Linux, Mac and Windows.1
  • Supports images as well as formatted text.
  • You can search the clipboard history easily (supports regular expressions).
  • It has a simple built-in editor of clipboard items.
  • You can control what gets into the clipboard history. And of course, the history is persisted among computer restarts.
  • If you want, you can control it from command line as well.
  • Nearly endless possibilities of customization, including running custom commands (see Commands).
  • A superb documentation (see Documentation).
And to mention some advanced "enterprise" features:
The only nice-to-have feature which is missing, is probably an automated synchronization of commands across multiple machines (e. g. in a company)...

Basic setup


So now that we know what CopyQ can do, how to make it run on our machine? We start by downloading an installer or a portable archive - simply follow the installation instructions.

Once the CopyQ is installed and running, we set a global keyboard shortcut for showing the CopyQ's main window. Firstly, we need to open the Configuration dialog from the system tray:


Secondly, we set the shortcut in the opened dialog:


Here we inspired from Ditto's default shortcut, which is Ctrl+` - i. e. hold down Ctrl and press the back-quote (tilde = ~) key.2

In the same dialog, we can choose whether we want immediate pasting after selecting a clipboard item from history, or not:


Add a tab for your favorite snippets


Next, we might want to add a tab for keeping our favorite code snippets (as seen on the very first picture above), or whatever we intend to use it for. This is as easy as pressing Ctrl+T in the main window:


Done!


Now we can just enjoy the CopyQ, let it maintain the clipboard in the background and use its main window and/or shortcuts whenever we need to return to a previous clipboard item, for example. The GUI and default shortcuts are pretty intuitive, so luckily there's only little to learn for the basic usage.

Documentation


CopyQ has a pretty good documentation and this post is definitely not meant to be its replacement. Beware though that there are some little gotchas:

  • The project's home page on Github contains some overlapping information (e. g. installation steps). And it is only here where you can see a quick overview of app's features.
  • If you by coincidence get to a project's wiki page like Basic Usage, run away - it got deprecated and replaced by the newer documentation.

Commands


Attention: It gets a little bit more technical in here!

Pressing F6 in the CopyQ's main window takes you to the management of commands:

An example of the Commands window. It shows the source code of one of the many built-in commands (selected & inserted via the "Add" button). Properties of the command are set in the "Advanced" tab.


While working with commands in CopyQ is great and thoroughly documented, I miss a quick overview of some concepts for newbies. So here is my little attempt to fix that (You might still want to read the official glossary page first.):

  • Commands are either built-in, or user defined. Every command is actually a readable script (with some necessary metadata - options). For the impatient: see this paragraph for various forms of the command scripts.3
  • Every command may be run in different contexts depending on what checkboxes get selected in its "Type of Action" options section. That is:
    • automatic (when there's a new clipboard item)
    • in menu (to run it over selected item(s); a shortcut may be assigned)
    • global (to run it at anytime when needed; a global shortcut may be assigned)
    • display (changes how items look like in the main window)
    • script (changes the default set of available functions, so a more precise name would be an "extension script")
  • If you don't see a built-in command, you need to explicitly add it to available commands via the Commands window (F6). Or, you can achieve the same effect by assigning a shortcut to the command in the Configuration dialog (Ctrl+P).
  • The Action Dialog dialog (F5) lets you run an ad-hoc command script instead of an existing named command. You have to explicitly select a "Standard input" for passing the content of selected item(s) to the script.
    Here's an example, showing a rather improbable scenario of converting a URL address to uppercase:

All-in-all, with CopyQ commands you can do lots of interesting stuff and there are many ways of how to create and use them. There is even a library of commands from the author(s) in a dedicated Github project called copyq-commands. Maybe in another post we will take a closer look at this!

Follow-up article: CopyQ - The most useful commands.

1 Ordered alphabetically.

2 Beware though that a keystroke which includes a key that maps to different characters based on the current keyboard layout (like Ctrl+`) doesn't have to work under all circumstances. See issue 1323 for more details.

3 As you may have guessed, the "copyq:" scripts are written in ECMAScript and you can call built-in CopyQ functions from them. So if you are familiar with JavaScript, you'll be like at home here.